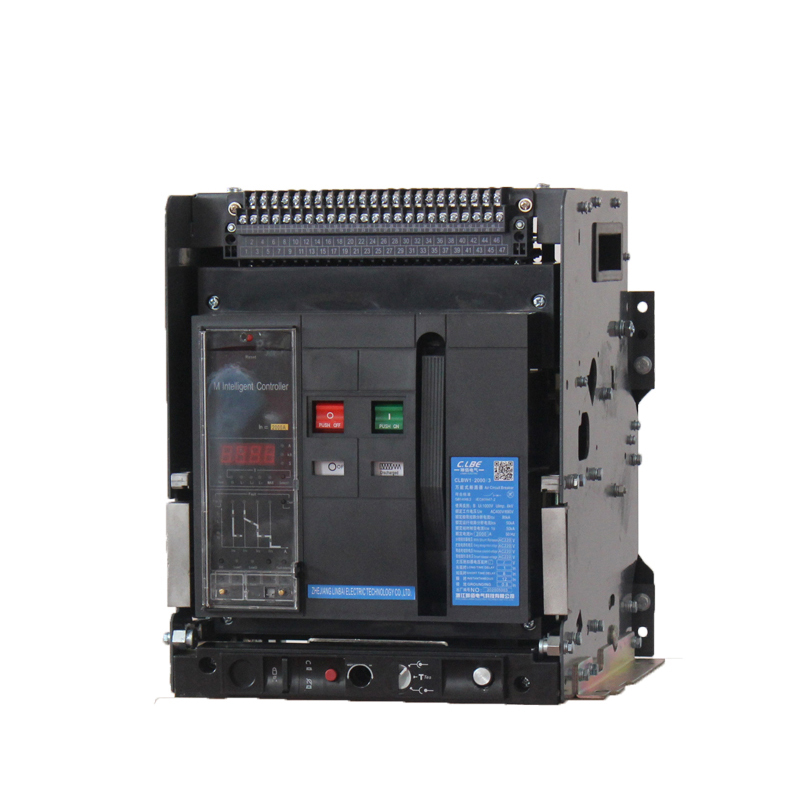
CLBM1E Series Electronic Molded Case Circuit Breaker


Contact:


CLBM1E Series Electronic Molded Case Circuit Breaker
1 Related matters before use
1.1 Notes for unpacking inspection
When you receive the circuit breaker you purchased,please unpack and check the following items:
1.1.1 Check if the appearance have any damage thatoccurred during transportation, such as damage to the casing.
1.1.2 Inaddition to circuit breakers, operation instructions and product certificates,the packing boxes shall be also installed with screws and related accessories.Please check them one by one according to the packing list.
1.1.3The environmental conditionsfor storage are shown in the table
| project |
standard |
| Ambient temperature | -25℃~+55℃ |
| Relative humidity | (when it’s 25℃ for the environment temperature)≦95% |
1.2 circuit breaker voltage
The rated operation voltage(Ue)of circuit breaker is AC400V, 690V. The rated insulation voltage(Ui) is 800V.The rated impulse withstand voltage(Uimp) is 8000V.
2.0 Installation
2.1 Insulation test
The circuit breaker has beeninsulated in accordance with the standard before leaving the factory.Due to thecircuit breaker has an electronic circuit board.Before installation, retestshould be conducted as follows:
(1) Using 500VDC megger to do the following test
(2) When the circuit breaker is in the state of disconnection,the connection between the inlet and outlet connection plates 1-2, 3-4, 5-6 andthe connection plates 1, 3 and 5 (the three connection plates are connected bywires) and the housing (the housing is covered with metal foil) are testedrespectively
(3) The insulation resistance shall be no less than 20MΩ between the circuit breaker housing and the maincircuit breaker when docking to the undervoltage tripper of the main circuit
If the user does not have 500VDC megger meter, the user can use the laborfrequency withstand voltage tester to do the replacement test
Refer to the insulation method for the measuring part, it takes 1min toapply the voltage 2000V.
2.2 environmental conditions
Do not install in an environmentcontaining explosive gas, otherwise there is a risk of explosion
Do not install in a particularlydamp place
Do not install in the place where theexternal magnetic field greater than 5 times the earth magnetic field,otherwise the circuit breaker will not work properly
Do not install in the place where vibration is greater than5g
Do not install in areas where the gas medium can corrodethe metal box and break the insulation
Circuit breaker installation site environment requirements
| project | standard |
| Ambient air temperature | -5℃~+40℃, 24-hour average temperature value shall be not more than +35℃ |
| Relative humidity | (when it’s +40℃)shall be not more than 50℃,The average minimum temperature of the wettest month shall not be more than +25℃, and the average maximum relative humidity of this wettest month shall not be more than 90%. The condensation on the product surface due to temperature change is also considered |
| altitude | No more than 2000 meters |
| Pollution level | 3 A |
2.3 installing method
Please install on metal flame retardant
2.3.1 product outlinedimensions and mounting dimensions
2.3.2. Thecircuit breaker can be installed vertically or horizontally
2.3.3 Installation and connection
2.3.3.1 The mounting plate trepanning is shown inthe figure
(1)Wiringin front of the plate(X-X, Y-Y are the Tripole circuit breaker center)
(2) wiringbehind the plate(X-X, Y-Y are the tripole circuit break center)
(3) Plug-in shape and mounting dimensions
2.3.3.2 Fix the circuit breaker body, bottom plate (for behindthe plate wiring use) and pedestal (for plug-in wiring use) on the mountingplate
2.3.3.3 Connect to maincircuit
Wiring work must be done by professionallyqualified personnel
Make sure the input power is completelydisconnected before wiring work
The installation of circuit breaker body mustbe done before wiring work
Circuit breaker wiring must be in accordancewith the up in and down out,of which 1,3,5 terminal connected to the powerline, 2,4,6 terminal connected to the load line, Do not to reverse line
(1) Connecting wire selection
The sectional areaused for connection wires and the corresponding rated current are shown in thetable below:
(2) terminalselection
The terminals for M1E circuit breaker shall be JGC or JBC (canbe provided according to user order), of which specifications and models areshown in the figure and table
(3)Insulation sleeve must be installed on the binding post when wiring behind theplate
(4) Connect the pressed wire to the circuit breaker’sconductive pole with a bolt (the bolt must be fitted with a flat washer and aspring washer) and tighten the bolt with the torque plate hand. The appliedtorque is shown in the table.
2.3.3.4 Installthe flash barrier between circuit breakers
2.3.3.5 Electricalwiring for internal accessories of the circuit breaker
(1) Undervoltage tripper
Access the power supply according to theterminal number on the external undervoltage module(Dc power supply need notdistinguish between positive and negative poles)
(2)shunt release
Access power supplyaccording to the number of lead wires (dc power supply does not need todistinguish positive and negative poles)
Note:when the user uses DC24V shunt tripper, the maximum length of the copper wire(length of each of the two wires) shall be as shown in the table below:
(2) Auxiliary contact, alarm contact
Accessthe corresponding peripheral control circuit according to the number of leadwires.